Stop Talking, Start Doing: Another Featherweight
This’ll be a monster post, etotheipiplusone style, so strap in.
It started off as a fairly simple plan: I have made zero progress on any featherweights I’ve set out to do mainly due to life (new job, new city, the paintball season (it’s a thing), filming, ‘Merica, lack of money, etc) – so naturally, it’s time to design a new one. And it’s also Robot Fightin’ Time over in the states, which is neat and gives host to a whole bucketload of ideas. So, we’re starting off this series of posts by fanboying over the 80’s Supercar in eye-searing yellow – Hypershock.
I’ll get this out of the way – I love Hypershock for a couple of reasons, but mainly because the brand is so. damn. well. executed. This appeals to my marketing, day-to-day brain. They have their colour scheme, their personalities, regular posts, enough fan engagement to let them in on a little bit of the crazy and Hypershock itself looks cool – deliberately. It’s beauty over function, but there’s a lot of potential badassery in the robot itself. Will Bales is the leader of the motely crew, but I think a lot of the credit for the visual design of Hypershock goes to Alex & Issac, for which I am very thankful for.

Hypershock might be losing in this photo, but they look good doing it. © Jon Bennett
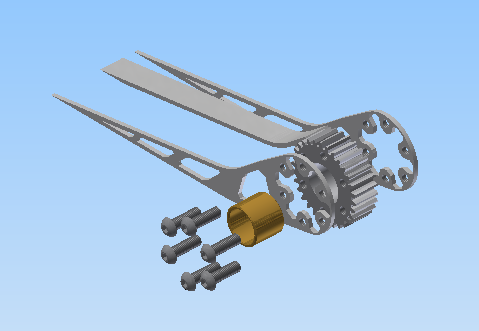
But anyway, the ramblings about Hypershock are all just preamble for the featherweight that I’m designing. But it didn’t start out as a featherweight. No, it started out as a set of lifter/feeder forks for Big Dave 3 so we’d be able to run it at Robots Live events (no spinners allowed) as well as having a backup weapon when something major breaks. But, as I’ve not designed for heavyweight classes for a few months now, I forgot everything was a bit bigger and buggered up the sizing. Yes, I could have just used the ‘scale’ function to make it normal sized, but it struck me that I liked the design at its current size. With some tweaking of thicknesses, attempted weldment (I don’t know how to do this, I ended up just swearing at it) and the mindset of “it’s gotta look good”, I came up with a lifting arm I was happy with from a visual standpoint, then set about making it usable by adding in a gear at the back, welding points, etc. It’ll all be made out of 3.2mm Hardox 500, with a 60 tooth Mod2 gear at the back for movement purposes. There’s also a bushing in the middle of it to get to a 25mm axle size. The CAD says it’ll weigh the better part of 800 grams.
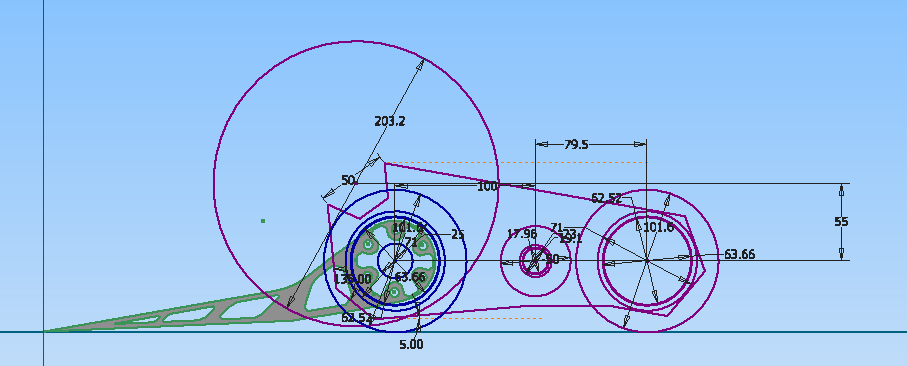
Then, as I normally do, I started messing around with a perspective drawing. I like doing these, it helps me get an idea of what the overall robot will look like and gets the idea out of my head and on the screen. I do them with a pencil as well, but it’s much, much worse.
Anyway, back to the 2D perspective drawing. I like big KE spinners, but with the scale of the front forks, an 8 inch disc looked good – keep in mind that my mindset is not form following function here, it’s purely visual. Some tweaking happened, then it struck me that wheels were needed. Useful things, wheels. To keep it all in the same plane, I drew them around the same centre that the lifting forks rotated around. Completely coincidentally, it turned out that a 4 inch wheel serves nicely for this, giving both ground clearance and keeping the angle that the forks are designed to look cool at.
With the wheel in place, I needed a method of propulsion. I’ve been wanting to use some Maytech stuff in a couple of builds, so I went with their 5065 motor. As with all of my designs, chains are simply out of the question because I have an inherent hatred/fear of them ever since all of my favourite teams on Scrapheap Challenge lost because of snapped chains. So – belts it is. Running on 8S, I’m expecting about 1500W at 5000RPM. A quick math & sensibility check settled me on a 40:12 ratio, or 3.33:1. With a 4 inch wheel, that’s 18MPH.
And front heavy.
So, a second set of wheels at the back to even things out looks good from a visual perspective and also has the benefit of helping with weight distribution. Add that disc back in and trace the outline of a mounting plate for it all… some funky angles and…oh. It’s a tiny Hypershock.
At this point, it’s nearly 11PM and sleep was calling. So, a screenshot and an instagram post went up and Hypershock responded – that is all the permission I need! RECOGNITION!!! Hypershock replied! Let’s do this! Woo!
But let’s get back to the practicalities of building the robot itself, and a couple of big decisions that I need to make. Namely, what to make it out of. The armour, I decided, should be a steel affair. Having seen Luna-Tic gain a reputation for durability with its 4mm Hardox armour, that is what I’m going to go for, but with some funky hexagonal holes in it. Why? It’ll look good backlit and I can push extra voltage through the LEDs at the back to simulate a brake light. I’m also really tempted to make the robot itself steadily grow more red as the disc gets angrier faster to give myself a visual indicator that the disc is at robot-destroying speeds. But that’s an electronics errand for a future post. The second thing is what should the rest of the robot be made out of? The toss up here was between aluminium and HDPE.
I like aluminium. Once it’s anodised, you’ve got a massive spectrum of colours and the additional hardiness of the 100 micron thick layer of dye – there are some molecular changes as well, but it’s late and I don’t want to get into them, nor do I quite understand how it all works. But the long and short of it is aluminium = pretty colours. On the other hand, HDPE does not allow for pretty colours – you’re pretty much limited to black or white – but does have the additional benefit of being far cheaper and easier to machine. Oh, and it’s lighter. My heart wants to go for some sweet anodising, but my wallet knows better than that, so HDPE it is. To compensate for the loss of some of the aluminium rigidity, I’m going for 30mm plates instead of the 20mm with pockets that I would have done with the alumunium. Weight wise, once all of the panels and wheels are accounted for, it should leave me around 5 kilos for the batteries/VESCs and the weapon assembly.
It should be noted at this point that, thanks to the incompetence of National Express, my laptop – where I designed this – is now dead and I need to resurrect it/complain loudly about poor driving. So, let’s pause the build for the moment and build a PC… stay tuned!
-Rob